Step-by-Step Guide to Knitting After Multiple Slip Stitches
Slip stitches are an important part of knitting and mastering them is key to creating beautiful projects. Sometimes, however, you may find yourself needing to knit after multiple slip stitches. This guide will walk you through the steps to help you tackle this task with confidence.
Step 1: Identify Your Project
Start by identifying what type of project you are working on and the required stitch pattern. This will help you determine which type of stitch you need to slip, as well as the number of stitches to slip.
Step 2: Slip the Stitches
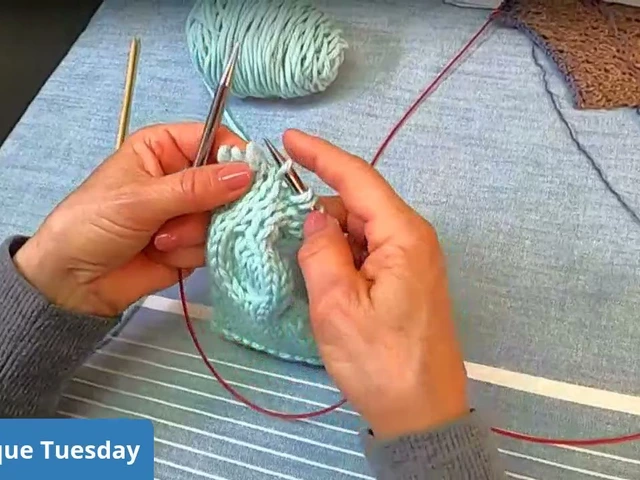
Using the appropriate needle, slip the required number of stitches from the left needle to the right needle. Make sure to keep the yarn in front of the stitches while slipping them.
Step 3: Knit the Next Stitch
Once the required number of stitches have been slipped, you can begin to knit the next stitch. To do this, insert the right needle into the next stitch on the left needle, making sure to keep the yarn in back of the stitch. Wrap the yarn around the right needle, and pull the loop through.
Step 4: Repeat
Repeat steps 2 and 3 until all the stitches have been knitted.
Step 5: Finish
Once all the stitches have been knitted, you can now move on to the next step in your pattern. Congratulations! You just knitted after multiple slip stitches.
Are you looking to master the art of knitting after multiple slip stitches? If so, then you’ve come to the right place! Knitting after multiple slip stitches can be daunting, but with this guide, you’ll be able to master the technique in no time.
The first step is to understand the basics of a slip stitch. A slip stitch is a type of stitch where the yarn is passed over the needle without being knitted. This allows you to move the yarn from one spot to another without working any stitches. The number of slip stitches you use will depend on the pattern you are working on.
Once you have a handle on the basics of a slip stitch, it’s time to move on to the actual knitting. The technique for knitting after multiple slip stitches is very similar to working a standard row of knitting. Start by inserting your needle into the first stitch of the row.
Next, wrap your yarn around the needle as if you were knitting a regular stitch. Then, slide the stitch off your needle and insert the needle into the next stitch. Wrap the yarn around the needle, and then slide the stitch off the needle. Repeat this process until you reach the end of the row.
Finally, it’s time to bind off. To do this, you’ll need to insert your needle into the first two stitches of the row. Then, wrap the yarn around the needle as if you were knitting a regular stitch. Finally, slide the two stitches off the needle, and you’ve successfully completed your row of knitting after multiple slip stitches.
With practice and patience, you’ll be able to master the art of knitting after multiple slip stitches. Just remember to take your time and don’t be afraid to ask for help if you need it. Good luck!
Knitting after multiple slip stitches can seem like a daunting task if you’re a beginner knitter. However, with a few simple tips and tricks, you can easily master this technique and create beautiful projects with ease.
The first step is to understand what slip stitches are. Slip stitches are the smallest type of stitch used in knitting. To create a slip stitch, you insert the needle through the next stitch on the left-hand needle, then draw the yarn through the stitch, but don’t take the stitch off the left-hand needle. This creates a loop on the right-hand needle.
When knitting after multiple slip stitches, you’ll need to work the same loop multiple times. To do this, insert your right-hand needle through the same loop, and then draw the yarn through the loop. Continue this process until you’ve worked the loop the desired number of times.
It’s important to remember that when knitting after multiple slip stitches, it’s important to keep your tension even. If you pull too tight on the yarn, you’ll end up with a tight, uncomfortable stitch. If you pull too loose, you’ll end up with a sloppy stitch. Work slowly and carefully, and you’ll soon get the hang of it.
Once you’ve mastered the basics of knitting after multiple slip stitches, you’ll be ready to tackle any project. With practice, you’ll soon be creating beautiful knitwear with ease!
Knitting after multiple slip stitches can be tricky, but it doesn't have to be. Here are some tips and tricks to help you get the hang of it:
1. Count your stitches carefully.
Before you start knitting, make sure to count your stitches carefully. This will help you keep track of how many slip stitches you have and make sure you don’t make any mistakes as you go.
2. Use a stitch marker.
Using a stitch marker can be very helpful when knitting after multiple slip stitches. Place the marker on the last stitch you knitted before you started the slip stitches. This will help you keep track of your progress and make sure you don't miss any stitches.
3. Follow the pattern.
When knitting after multiple slip stitches, it's important to follow the pattern exactly. Pay attention to the instructions and make sure you knit the stitches as the pattern calls for. This will help ensure that your project turns out the way you want it to.
4. Take your time.
Knitting after multiple slip stitches can be tricky, so don't be afraid to take your time. Don't rush the process or try to do too much at once; take it slow and steady, and you'll be sure to get the hang of it in no time!